 Neil's Meccano And Stuff
I have been making models forever - and with Meccano since I was a young lad. I must have built hundreds over the years. As an adult I rediscovered the hobby around 20 years ago and have found it both enjoyable and challenging. These days Meccano is largely an adult hobby in the same way that model railways has become. There are many Meccano clubs around the World and I currently belong to four of the many UK clubs. I nearly always invent my own models, just occasionally working from a plan and I find that patience and imagination go a long way towards replacing my lack of any engineering qualifications.

A little model of an AEC Matador lorry-mounted crane. This type of vehicle would have been used during the Second World War by the RAF. Although the model is small, it has plenty packed-in, including working steering, slew, luff and hoist, a chassis-mounted winch and a swivelling work-light.
This one was mostly made from really old parts which I stripped and gave a blast of car paint.


By way of contrast, this was quite a big one. A Scammell explorer weighing over 60 pounds. Everything worked but it was really a bit too big and a very slow crawl was all that it would manage. When this model clambered over your foot, you knew all about it!

I think that I found a natural limit to Meccano road vehicles with this one and I did say that I would not build anything quite so heavy again. The model featured six wheel drive, an extending crane, chassis-mounted winch, working gearbox, differential, suspension, steering, lights and so on.

The powerful electric motor was hidden inside a mock-up of the diesel power-plant.

A BMW R75 combination from the Second World War (one of theirs!). The prototype had two-wheel drive with a shaft running from the back wheel of the motorcycle to the sidecar wheel. The model also features two-wheel drive with a differential mechanism under the sidecar floor and a stack of AA batteries in the sidecar boot. A 12v motor is buried in the replica BMW engine.

This was not a fast model but it ran ever so smoothly. Unfortunately it was the wrong scale for an Action man to ride, which might have been a nice addition. I learned while making this one, that motorcycle combinations had the sidecar on one side or the other, depending on which side of the road that country drives on.

From around a hundred years ago, 'Gracie' is an Aveling and Porter steam roller and living van. This model picked up 10th prize at the World's largest Meccano show in 2012. For me, this was a massive thrill as the competition was so strong and I really didn't expect to be in the running at all.

A busy model, with a single cylinder motion, Stevenson valve linkage, water pump, oil pump, governor, working winch, brakes, differential and two-speed gearbox. This model is powered by a small but powerful 12v motor hidden under the floor and with a 6v battery in the living van. The roof of the living van hinges to show a basic interior with bunk bed, table and stools, wood-burner etc. The model runs along very nicely.

A Leyland observation coach from the 1950's. This picture shows one technique which I like to use. I will sometimes build a skeletal framework in order to get the main sizes and shapes right before I dive in using good parts. Although it means 'building it twice' this approach saves a lot of time in the long run and making changes to the skeleton is very easy whereas changes to a 'finished' model would take very much longer.

This model was loosely based on a plan by the late Adrian Ashford, a real master-modeller whom I was fortunate to have known personally for many years. I changed quite a lot for my model but it sometimes helps to be given a kick-start by using a decent plan as the basis of a model.

With Batteries onboard, a three speed gearbox and centrifugal clutch, this model was quite nippy and proved popular at exhibitions. It was big enough to look effective but small enough to put under my arm.
Ahhh - "The Swift Speedboat" - Around 1932 Hornby/Meccano released a range of clockwork boats. These were made of tinplate and had clockwork motors. They were really lovely things and to show up at your local boating pool with one of these would have been quite something 80 years ago.

Mine is Boat Number Two - "The Swift" and was a rare eBay bargain. The large blue plate on top is held by two bolts and hides the clockwork mechanism. A felt gasket keeps the water out.
A simple device stops water entering through the keyhole and the model is fitted with a rudder which is held in place by a simple detent. This beauty is so cool and does make most modern toys look pretty lame.

This one was a bit different - a Mercedes Unimog Rock Crawler. The model weighs in at nearly 40 pounds but it has an excellent turn of speed. This is achieved using a monstrous motor and a 7.2ah, 12v battery. The suspension travels about 4 inches and the whole thing is radio-controlled. Over the years I have designed several radio controlled models

This model was trouble all the way. The torque produced by the motor would twist standard universal joints so after-market solid brass CV joints were needed. Spur gears would spin on their bosses and every single shaft needed flats filed onto it to stop the various transmission components from just spinning on them. The steering was also more complex to allow for the massive wheel travel - and of course, it was 4WD too. I think that other modellers recognised the amount of work hidden in this model because to my huge delight, 'Big Mog' was a prize-winner in 2013 - I was chuffed.

The wooden crates looked good but also held the RC components, insulating them from the metal structure and so reducing interference.

Basic interior modelled from restored parts.

A Meccano Dealer's Cabinet from the 1950s. In the good old days, every high street would have at least one good toy shop. Meccano was one of the most important toys (alongside Lego, Airfix, Dinky, Action Man, Keil Kraft, Hornby etc) and so each toy shop would have a stock of Meccano sets for sale. The really good toy shops also had a Dealer's Cabinet. This was a box in which the shopkeeper would keep Meccano spare parts. There was one in my favourite toy shop, 'Jennings' in Bexleyheath. The cabinet sat on the counter with the back of the cabinet facing the customer. The back had a large picture on it showing the complete range of parts and the drawers would open towards the shopkeeper. My Dealer's Cabinet looked as if it was in quite poor condition when I got hold of it but it only needed some TLC and has come up really well.

The Hagluund BV206 was a go-anywhere vehicle used all around the World. One appeared on the TV helping during the 2014 Somerset floods. The model is very small. Each car has its' own motor, gearbox and differential. Every axle is sprung. The rear car houses a 12v battery and the front one houses the radio-control components. The model performed wonderfully well but not for long, as the battery was small and two motors drained it rapidly.

Quite a simple model with a pre-assembled radio control chassis. This one was sold by Meccano as a kit but I could not leave it alone and have modified it quite a lot. I think that my changes have just been enough to lift this from being a toy, to being a model. Meccano now make a number of pre-assembled radio control chassis' and they are great for getting youngsters into RC, which was horendously expensive when I was a youngster.

Set 8 'Police Patrol Car'. In my opinion, one of the best of the set models and my first build using red and green parts. This one was spotted many years ago by Richard Smith's grandson and has been in his toy box ever since!

One club that I belong to holds an annual 'Scrapheap Challenge'. One year club members were challenged to build something which walked on six legs and was powered by a Number One clockwork motor.
This little alien shown crawling in my back garden was my entry and he did win. Other entrants were far more elegant or inventive - sometimes you just get lucky!

Another Scrapheap Challenge was to build a model powered only by a tin of baked beans.
My model started the race with the tin at the top of a tall tower. A string ran upwards from the tin, around a pulley and all the way down to the bottom, where it joined a pulley system which was wound around one of the two axles. As the tin dropped, it unwound the axle and the vehicle slowly gathered speed. My model also incorporated a freewheel mechanism like on a bicycle, so that it would carry on moving once the tin reached the bottom. This one worked really well.

My AEC Routemaster Bus (see separate tab).

A WW1 aeroplane next - ideally with a pilot & co-pilot. This led to the two characters shown here. The pilot sits down and the gunner stands, so each figure has different degrees of articulation in their bodies.
They were genuine Meccano, but needed something to wear. The only answer was to make two 6" First World War German flying suits - a long way outside my comfort zone but surely worth a try...

The uniforms were made from felt, soft enough to allow the limbs to bend and looking a lot like heavy, woolen uniforms.
At the end of the day, I was not looking for perfection - just something fairly believable.

In an artistic moment, I had a go at painting the 1" pulley faces of these two characters and the results were very pleasing, and will certainly make the model more interesting.
They were the right size, articulated, dressed correctly and other than a few scraps of felt, they were genuine Meccano.
Now I had 'Otto und Hans', and all I needed was a decent aeroplane for them to fly.

Here is the fuselage of my Hannover biplane. At this early stage, the model is being built 'in rough' so that I might get the shape right and decide which parts I will need to use. Later on I will rebuild it in good parts. The pilot figure is a perfect fit and the gunner figure will stand behind him. The choice of this particular aeroplane was made largely because the shape of the Hannover is challenging but quite possible to capture in Meccano.

And there we have it. The finished model on display in 2015.
I created a special gadget to roll the leading edge of the wings so that every plate is identical, without any kinks, and with each rolled in exactly the same place so that they could be bolted together into a straight run.
Not a complex model - but another prize - I am thinking that more simple models like this one may have a lot to offer.

Look out below!

A Camel Trophy Landrover. It has full proportional remote control and is just packed full of gubbins. Headlights, spotlights and tail lights operate and I have incorporated an isolator switch so that the 12v battery can be recharged without removing it.

The model has sprung rear suspension and a swinging front axle. At this small scale I was unable to squeeze in 4WD or a differential but it is great fun. The wooden crate on the roof rack houses the RC receiver and overall, it has turned out to be a very pleasing little model.

Encouraged by my success with Hans und Otto I am 'toying' with the idea of going a bit larger.
This chap is fully articulated and made entirely of standard Meccano parts.
He is 10" tall and would go well with a Military vehicle - hmmm.

Another club to which I belong recently celebrated its 30th birthday and held a competition to build a model using no more than 30 parts (not including standard nuts & bolts).
My windmill is powered by a clockwork motor and uses exactly 30 parts - no prize for me though, as other modellers created some terrific 30-part models.

The 'Gama Goat' was a US Army vehicle from the era of the Vietnam war. It had six wheel drive, four wheel steering and was amphibious.
The Gama Goat consisted of two units, joined by a flexible coupling. Numerous design faults made it unpopular with its crews but it was a very interesting vehicle and would make a good model.

Here is the rolling chassis on my workbench. The two units are not yet joined together.
The large wheels set the scale - this will be a decent sized model but not an enormous one.
So far we have six wheels all going in the same direction, at the same speed, three differentials and steering at both ends - a decent start.

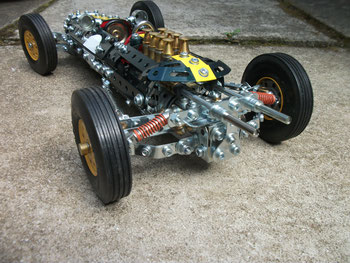
I am also playing around with a Lotus 25 Formula One car from the 1960's. I have wanted to make one for ages but was not sure that the shapes would be possible on a fairly small scale.
This is just a very rough first pass and is now (May 17) being rebuilt using good parts.
Watch this space...

Of all the models I have built, this very simple one is amongst my favourites.
It was such fun to build and the absence of a motor just made everything so much easier.

Only when I started to research the real Lotus 25 in more detail, did I realise that the whole upper body was removable in two sections. I don't think that modern Formula 1 cars can do this - perhaps they can.
This set me wondering if my little Meccano model could pull the same trick...

Of course, it was a lot more work but I really think it was worth it.
I have been able to include the bucket seat, with fuel tanks on either side (those lads had some guts!), master cylinders, radiator, rack & pinion steering and so on.
On this small scale you do have one big advantage - people notice how much detail you put in - on a large scale model, they notice how much you leave out!
I was very lucky that the sizes of standard parts suited the model very well. This was especially the case with the flexible plates throughout the whole build.

I think that the Coventry Climax 1498cc V8 looks believable. I did model the snake-like exhaust manifolds on each side of the engine from black-covered 3mm cable but it was just too tight a fit and so I left them off. Unlike the real Lotus, my model has nuts and bolts which must scale up to several inches long and had the model been riveted together then I might have had enough space.
Meccano though, is all about getting 'as close as you can' and I doubt that many folk will even notice the missing exhaust manifolds or missing windscreen (something else which I tried to make but gave up on). It is the overall effect that counts.
The white circles and yellow stripe are sticky-back plastic. I tried to spray them but failed dismally.

So, back to that 10" figure driving my Gama Goat US Army 6x6. I had a temporary loss of interest (often a problem with me and a big build) but the model is finally progressing. The existing crewman needed a couple of pals and here they are.
There is a lot of work in each of these - would you believe that (including nuts, bolts and washers) there are 20 pieces in each of the heads alone?!

Far from finished but 'the big parts' of this model are now all in place. The electrics and all of the RC have not even been started yet and the crew figures are on the kitchen table, having their faces painted today.
Many, hours still lay ahead.

Here is the first crewman. The head is 100% Meccano, as is the body but it is amazing what a bit of paint will do.
I am really chuffed with how these little guys have turned out.
Their 'bibs' are simply paper, temporarily in place while painting, so that I don't get paint on their uniforms.

There is quite a bit to squeeze into this model in terms of radio control, batteries and so on. A trick I have used before is to have a model lorry carrying some crates and for these to house some of these electrical components.
This has multiple benefits because as well as gaining some extra space and being easily accessible, the radio control works best when not buried inside a metal model.
I tend to make my own wooden boxes from fine strips of timber, to get the sizes just right.

Whilst most of these boxes simply 'hold something', this one is quite structural inside. With a non-Meccano R/C car, a servo is connected directly to the steering mechanism but a large Meccano model is so heavy that a servo simply lacks enough power.
My solution is to use the servo simply to operate a fwd/off/rev switch, which then passes current to a powerful geared motor, which is connected to the steering mechanism - so the R/C simply works a switch and does no work.

This model has steering on the front and rear axles and the easiest way to model this is with 2 separate steering motors. This means 2 servos operating 2 switches and hence the box shown above contains all of this gubbins. The springs allow the servos to move 'too far' without damaging anything and also ensure that the switches return to the 'off' position when the RC is released.
Here are some other boxes which I have made in the past.

The underside of the tractor unit undergoing some wiring work. I like to keep the wiring quite tidy and use a lot of small plastic 'P' clips.
Of the tractor and trailer, the tractor is mechanically more complex, with two differentials, swinging rear axle, powered front axle steering, 4 wheel drive and the main drive motor and its reduction gearing.
Electrically though, it is relatively simple compared to the trailer, where all the R/C is situated.
The whole model is complex though, and too heavy - definitely something easier next time!

This is the underside of the trailer - not finished but largely done.
The first test run of the whole model went dreadfully. The transmission jumped out of gear constantly, the steering didn't work properly, the RC played up etc.
I was very close to taking it all apart in disgust but after a brew, I had some ideas. So, the centre axle was simplified, more flats were filed on important shafts, the RC was tweaked and I may yet get a decent result.

Here it is then - just about finished. It all works after a fashion, following another re-wiring marathon today.
I enjoy figuring out the inevitable snags with these models and being able to create something from my imagination which nobody has seen before.

Here is the finished model at a big Meccano exhibition.
This image clearly shows the four-wheel steering in action.

The model was well received and worked very well over the long weekend. 7th prize overall was a real bonus.
I've said it before - but I must build a few smaller models so that other things can also get done at home.

My first ever model using blue & gold parts from the late 1930's. Most of my blue & gold is in poor condition and this little model has original plates but restored strips, brackets and wheels.
This diminutive model has plenty going on, with a small motor, working steering and suspension and with 3 AA batteries hidden in the tail, it is very fast too.

A recent find was a decent amount of Mechanised Army Meccano. This rare product was made only from 1939 to 1941 before production at the Meccano factory was turned over to munitions production.
This set had many unique pieces - usually in the form of more familiar parts but with far fewer holes stamped in them.

My other current project is a small locomotive.
Trying to add a little more interest to this, I am attempting to include a set of points in the rails.This image shows the basic chassis negotiating the turn-off.
Getting this to work nicely will be a challenge. One snag is that Meccano rails have rounded ends, whereas real rails have squared ends. This makes the joints at the points harder to model where I need to leave gaps between rails (either to enable electrical isolation or to allow the loco wheels to pass between rails). Also, I think the points section needs to be longer, to make the curve less sharp. It is these challenges though, which also add so much interest and if it was too easy then I would probably find a different hobby.

Inspired by the little blue & gold racing car, I got thinking about building another one. I am having a go at a small but detailed Morgan 3 wheeler from the late 1930's.
I found original factory sketches online and drew these out at 1:1 scale on A3 paper. This is another very handy advantage of building smaller models.

I am building this one with old parts first because I know I will have to make lots of changes as I go along - "Build it/Change it".
The real car had a space-frame chassis and I have tried to suggest the front end of this.

So, this image shows where the batteries will need to go. I planned to use 3 AA batteries but could just about fit in 4 of them, giving 6 volts which is the limit of the motor being used.
The batteries cannot all sit together so I will need to solder connecting wires onto them - not difficult to do. At least they fit.

Here's the nice version coming together on the bench.
It wasn't quite plain sailing as the rough version didn't include everything needed on the nice one, so small changes were needed along the way.

Here is the underside of the model at a well-advanced stage. It is a tight fit to get everything in but it will all go.
The chassis is fitted, along with the front space-frame, the Meccano motor, drive train and four AA batteries. The (fairly simple) wiring is complete and everything works.

The finished model. I am very happy with how this has turned out. One benefit of not using genuine gold parts, is that I can spray parts gold which had not been released in the 1930's.
Quite a few of the 'gold' parts here were actually made in the wrong century to be wearing that colour.

On this small scale there will always be compromises. Meccano spacing allows you 1/2 inch leeway and on a large model you probably wouldn't notice that something was 'one hole' too large or too small or that a component was positioned one hole in the wrong direction.

You may recall that before getting distracted by little cars (which is always likely to happen again), I was tinkering with a narrow gauge locomotive.
Here are the two piston blocks. I knew that these complex shapes would be a challenge but they came out quite nicely in the end.

This image shows the basic elements of the Walschaerts valve mechanism in place.
Whilst the chassis will roll along very smoothly, there is a lot to be done in terms of getting the various linkages to occupy a more narrow space. This will involve using modified nuts and bolts which 'stick out' less far.

Here I have revised the chassis, fitted a motor and gearbox and have it running quite nicely.
I have started to mock-up the boiler using old parts which will later be resprayed.
At this stage in a model, a little imagination is handy!

I have now got the chassis picking up power through its' wheels (like a Hornby train). This has required the wheels, bearings and motions on one side, to be insulated from those on the other side. This image shows the spring-loaded pick-ups which press against all four wheels to maximise reliability.

My plan is to have multiple track sections like a model railway, which can be quickly slotted together and secured with a pair of bolts. This image shows how each end of the track is different to facilitate this.

One problem has been the flanges of the wheels shorting across the positive and negative rails where these come together at the crossover.
After insulating with tape and other experiments. I rebuilt the crossover using Meccano fibre strips as shown here and it all seems to work quite well.

This unique loco will need a crew of 3 or 4. I am tackling these as I did in the biplane model. The driver is shown here, made entirely from standard Meccano parts, apart from his clothes and a short piece of insulating tape which bridges the two 1" pulleys forming his head.
In the loco this little chap will operate a steam regulator and a reversing lever, so his arms are freely articulated. He needs to stand upright so he has stiff legs and feet and he bends at the waist against a spring which brings him back upright.
The clothes are made from felt. I made paper patterns from them, once I had them right, so that the other crew members would be easier. My needlework is still not good!

The mechanism behind the boiler wall is there to provide animation for the driver - so that he is seen to operate the two hand controls at either end of his run.
Powered by a small motor, a pair of micro-switches work with a couple of diodes to prevent any motor over-run.

Here, I have roughly built the cab/boiler unit in old parts. This lets me easily make changes until I have the shapes and sizes right.
I then took a pile of photos before dismantling the whole thing again.

Here is the boiler and rebuilt cab as a single unit.
The basic shape is right but there is a lot to be added still - a few bigger bits and a whole lot of smaller detail.

So, here is the hammer-man. His job on the real loco is quite literally to sit in the coal bunker and break-up huge lumps of coal with a hammer, before feeding them down a chute into the cab - one tough job!
This whole motorised module will (just) fit into one side of the coal bunker.

Here is the cab/boiler unit with the steam dome, saddle tank and chimney added.
It is finally looking like a locomotive and is taking on a nice 'busy' appearance.

I want to have 'piles of coal' in the large coal bunker but without actually having to carry messy coal. The answer, is to have stiff card structures in the coal bunker to which a thin 'surface' of coal can be added. Here is one such card piece - the random-looking shape is anything but random.

Here is the coal in position. I break up lumps of real coal, glue them down with PVA and then spray the whole lot satin black to seal it and to hide any white glue or card.

The wooden re-railing pole as on the original - ready to get the loco back onto the rails when it comes off (not 'IF' it comes off).


The finished model.
Displaying at various clubs and exhibitions ironed out all remaining snags - with lots of help from the model making community, who are an outstanding group of people
https://youtu.be/Ae0N6iLPQYY

Time has moved on without much model-making, as I have been busy with work and the house and the Mini. My best pal, Richard Smith is a fantastic model maker and has just released a Model Plan for his charming model of a 1950/60 tractor (his beautiful red & green original is shown here).
Richard would describe his model as being fairly generic, but loosely based on a Ferguson TE20 (the likeness being obvious). It has forward and reverse drive, working 3-point linkage, power take-off, steering, differential, rear brakes etc - in short, it is a stonking model. I fancied building this one myself but the wheels on Richard's model are not Meccano and the only rear 'Tractor tread' wheels which I could find were slightly larger, which meant rescaling the whole model.

Here is my belly plate. The TE20 had a rocking front axle beam which was slightly higher in the body than on Richard's model and was also raked backwards as shown.
As usual, I will build the model in rough parts first, making any changes required, and then rebuild it in resprayed parts.

I had one huge advantage over Rich. Because he has been making a model plan which will be sold to other enthusiasts wishing to build an exact copy of his model, he must use standard Meccano parts wherever possible. However, I am building 'my model' and so I could do whatever I wanted. This included using a few narrow-face pinions which have helped the smooth operation of the gearbox by giving slightly wider neutral positions. This image shows the gearbox with the modified diff and three-point linkage attached. Buried in the gearbox is a small geared (60rpm) motor which will power all the functions via the three gear levers. There are already 30 gearwheels in the sub-assembly shown here and a lot more to come - certainly more than are needed in the real tractor.

Here is the Ferguson 3-point linkage which revolutionised 1950's ploughing.
I have shamelessly pinched Richard's design but will be making some minor tweaks, like the wider rear track to match my larger wheels. This approach, of taking an already-good plan and personalising it, is a useful shortcut to ending up with a nice model which still has your own stamp on it.

So, I have stripped the model down, cleaned the brass, stripped and painted the coloured parts in a nice gloss grey and rebuilt the whole thing with several more tweaks as I have gone, including changes to the fan drive. This fairly small model now contains around 40 gears, with more needed in the steering.

Here I have the wheels in place, along with the raked front axle beam & larger fan.
There are plenty of challenges ahead but progress has been quite rapid - thanks to having Richard's plan to guide me with the complex gearbox.

Starting to build the engine, which will consist of block, cylinder head and rocker cover, with the oval-section fuel tank on top.
Like the gearbox, the engine assembly needs to be easily removable to access the mechanisms within.

Unlike Richard's version, I want the hood assembly on mine to open. Here is my prototype, again closely based on Richard's plan but with minor tweaks.
I need to rebuild it with grey-painted parts but also with shortened bolts (which I need to make) so that the hood will close over the engine and radiator etc.

Here you can see the oval-section fuel tank and the bare shell of the radiator.
There is some detail work remaining but it is certainly looking like a TE20.
The total gear (and sprocket) count must now be nudging 50!

Just about finished. I am very pleased with how this one has ended up. Equally important was that Richard loved my interpretation of his original design.

The grey colour looks good and the cleaned brassware and black parts break it up nicely.
Intended for the Skegex 2020 exhibition, the impact of the pandemic means that it may not be seen until 2022.

A new model for 2022 - a VW Type 2 custom pickup, carrying a barn-find Norton flat-tank racing motorcycle combination.
My day-job has been very busy, so a simple model made sense. Mostly built with older parts, resprayed in VW Mars Red and VW Pastel White. The 'VW' badge on the front was a Meccano brass wheel disk - and took nearly two days to make!
Doors open, sides hinge down, side lockers open, vehicle drives along and steers and the mock engine spins behind the opening engine cover at the rear.

The Norton racing combination has been pulled out of a barn and is being taken home to restore by the owners of the customised VW.
Lots of thought went into choosing the right parts and the overall effect is very pleasing. This model, along with the Little Grey Fergie, were shown at Skegex 2022 and seemed to go down well.

As with almost all of my models, this one is all my own design - starting with some images and drawings of the real thing and then constructed in old parts with a lot of trial and error.
I then take a lot of photographs before dismantling, respraying and then carefully rebuilding. This model is quite a simple one, but I have thoroughly enjoyed building it.