 Neil's Meccano And Stuff
My Mk1 Austin Mini

My 1967 Mk1 Austin Mini has been on hold for too long. I have never allowed it to get in the way of family time but other hobbies, work and keeping the house together have also slowed my progress.

Some areas are the original Island Blue paint rubbed back, other areas are etch primer over bare metal, front panels are new and still in black primer
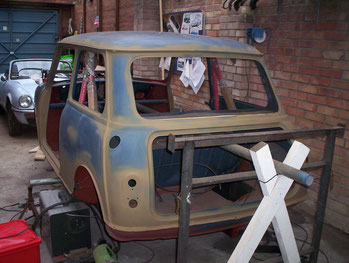
It was never my aspiration to make this a show car - just a solid, rust-free road car. I did not go back to bare metal. Where the original paint had remained perfect since 1967, I thought it was best left undisturbed and just rubbed rub it back to provide a key for the next paint layer.
The brown paint is the etch primer, on those areas that needed it.

On top of the etch primer came a couple of coats of grey cellulose primer which were carefully flatted before the top coat went on. The top coats were applied in progressively more diluted form.

I rigged up this device (from junk which I had hanging around - it cost me absolutely nothing) to roll the shell (as they did in the factory) so that the underside could be welded and sprayed properly.
The Mini used to share the garage with an old Spitfire - now long gone (it was great fun but needed more work than I had time for).

The shell is pretty straight and is 'square' but I have done an awful lot of welding.
In years to come (perhaps as a retirement project) I might rebuild it again but for now, this is good enough - solid and straight and zero-rust.

A layer of rubberised stone chip paint (which will never go entirely hard) has subsequently gone over the top of the Island Blue on the underside (This image was taken soon after I sprayed the colour coats).

The respray went very well.
This will never be a concourse condition car as it just needs so many replacement panels for that. Instead, the idea is to build a car which has a few honest ripples and which people will hopefully look at and wonder whether or not it has ever been restored - in a way, this is harder than making it concourse - but far cheaper!

I chose to use this later 'rod-change' gearbox, after giving it a full rebuild. This was a job that I had not tackled before. I would ideally have used a remote change Cooper gearbox (which would have gone straight in) but I do not have one and they are getting expensive. This one could well be better in the long run, but will certainly be harder to fit.

Diving into this little lot was a bit daunting. I have changed complete boxes before but never rebuilt one.
It's only nuts and bolts though - how hard can it be?

This may look a bit of a mess but I was very pleased with what I found in the bottom of the gearbox - or rather, with what I did NOT find.

So, out came all the innards - giving me few problems but a huge pile of quite complicated bits on my workbench.
This does not need to be spotless but it does need to be cleaned, not least so that any debris can be spotted, which would tell me if I had any damage. Luckily the damage was only medium wear in some bearings and it seems to be a good box.

Everything went back together well. This image shows things almost finished.
A couple of new bearings were needed and I took the chance to upgrade to a central oil pick-up pipe. This cheap conversion means that oil is pulled from the centre of the sump rather than from one end, which prevents oil starvation when cornering hard.

All done - the biggest headache mechanically is that this will be a bit of a mongrel - made up of at least four Mini's. Fortunately I have a reasonable stock of parts to mix and match - and fortunately there is nothing with Minis which has not been done before. There are parts from three Minis in this picture and this sub-assembly is about to go into the subframe from a fourth Mini.

At the rear of the car (for now at least) drum brakes will be retained. Again, I have various sets hanging around. Needless to say that all of these components were in need of some TLC.
Having spent so many years working with old cars, I have learned that you must not judge something by first appearances and that even something looking quite rough can live to fight again - if you really want it to.

This is the same brake assembly, mounted on a restored radius arm from another Mini - new parts were limited to the slave cylinder, shoes, adjuster screws, springs, bearing and studs, most of which are consumables anyway.
The studs are longer than standard as the wheels will be spaced out from the hubs.
In time I may upgrade the rear brakes but they are fine for now.
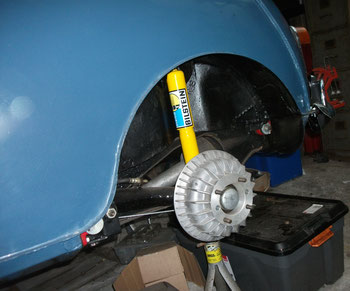
I have fitted aluminium alloy 'Minifin' style rear drums which improve braking and reduce over-heating.
Shortened shocks are fitted to manage the lowered suspension setup.
Also fitted are negative camber brackets which hold the rear radius arm at the desired angle to give additional negative camber to the rear wheels.

Suspension tweaks continued at the front end with modified lower wishbones to hold the wheel at the right angle and shortened shock absorbers.
The steering rack has been rebuilt from two damaged ones and now feels excellent.
Track rod ends will be from a Triumph Spitfire - don't ask!
My Mini originally had hydro-elastic ('Wet') suspension but mine was shot and new hydro-elastic displacer units have not been manufactured for some years. Consequently I have converted my suspension to use rubber ('Dry') suspension units which also offer better performance (although with a firmer ride).

Here is the original heater. My Mini was the 'Super Deluxe' model but the most basic ones did not have a heater as standard.
I have since rebuilt this heater using the modified innards from a later one which I had in my stock-pile.
These were never great but I am not looking for comfort in this car.
Nowadays almost all cars are fuel-injected but back in the day, carburettors were used to get the fuel/air mixture into the engine.
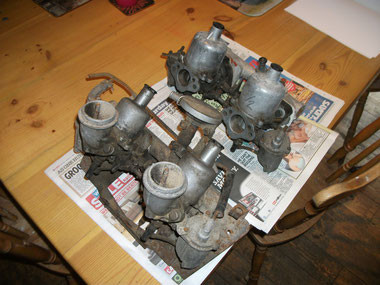
Non-Cooper Minis had one 'carb' for all 4 cylinders but the Coopers had one carb for each pair of cylinders - twice as much fuel giving a much bigger bang. I had a couple of sets of 'twin carbs' and scavenged enough parts to make one good pair.

The bigger pair are 1.5" SU carbs and these would be great on my large-bore Mini. I bought these years ago at an auto-jumble and they need a lot of love. First step is a strip-down accompanied by lots of digital pictures. It is February and freezing so I was grateful to Gracie for letting me do this job on the kitchen table. Luckily we both like the smell of petrol!

Seeking jobs to do (mostly) indoors while the weather was so cold, I had a go at restoring the original rear parcel shelf. This was pretty horrible and could just as easily been thrown away. Whilst reproduction ones are available, I would rather save a part of my 1967 Mini.

The original vinyl almost fell off the original hardboard, which served as a template for a new one, the vinyl was cleaned and spray adhesive used to put it all back together. Here it is finished - total cost was around 2 pounds, it looks pretty good and is in keeping with the rest of the car (and almost as old as I am) - great.

This should unlock some power. A very cheap used cylinder head and I think, a bargain. Downton-styled big-valve head with an unleaded conversion already done. Don't be put off by the scruffy appearance as this will clean up well. Just doing an unleaded conversion on my old head would have cost double what I paid for this and the bigger valves come for free!

I took the head to Spamspeed near Stroud, and had the face skimmed to raise the compression ratio. I then reground all valve seats by hand, cleaned all valves on the lathe, reshaped the inlet and outlet ports, washed, cleaned and painted the head and rebuilt with new springs matched to the performance camshaft.

I opened out all inlet and outlet ports using tungsten carbide burrs. I was careful not to go too far, using a manifold gasket to scribe the maximum sizes. There is plenty of scope to return to the cylinder head at a future rebuild.

One of the biggest problems is with the gearbox, The rod-change unit I am using has 4 synchro and is very strong but is from a more modern Mini with a very differently shaped transmission tunnel.
I found a company in the USA who make a special bracket which moves the gear change way over to the left hand side of the tunnel.

This should leave room for the exhaust to fit beside the gear change. The bracket is $60 + postage which is expensive. I think that mine is an exact copy but cost about £5. This replaces the original bracket but pushes the gear change over to one side. Using such heavy gauge steel, this was a pain to make but the end result does look great and could have been made in a factory - it may even work.

The new hole in the floor (later reduced in size). The handbrake is fitted and the indicator stalk (made from two old ones).
The seat brackets are fitted (now on the rear of the bulkhead) and new screw-eyes for harness seat belts.
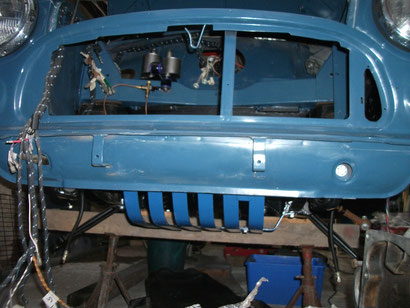
Heavy duty sump Guard fitted - I first fitted this actual sump guard to a Mini around 30 years ago and have had it hanging around since I took that one off the road. It needed stripping and repainting and some new bolts welding on for the removable section (to give access to the oil filter) but it looks fine.

They call this a Quickshift gear lever. A spacer goes on top of the old gear change unit and then a new gear lever which has the fulcrum higher up. This means that a much shorter movement is needed at the gear knob end, giving a sportier and more modern feel.
A bias spring will also be fitted to give a more modern feel - all easy changes.

I would love to have a Snap-On tool box but cannot justify the cost. However, I did have this old box sitting in the shed - hmmm...

One small tin of paint and some stickers bought on-line for a couple of quid and a bit of model paint on the drawer-pulls and there you have it - a 'new' tool box!

Here is the engine, slowly coming together. The block and crank were sourced from Jonspeed Racing and they seem to have made a good job of the machining work to open this out to 1340cc. I have found Jonspeed to be courteous and extremely helpful.
Similarly helpful has been my wife Grace, for allowing me to build this engine on the kitchen table!

I am taking care with each stage and referring to lots of reference info as I go. I have built a few Mini engines but needed to jog my memory endless times. I am really enjoying this stage of the build and have been able to restore and re-use many original parts from my stock. Care must be taken with cleanliness, lubrication, tolerances and torque settings - don't rush it..

What's cooking tonight?
A Mini flywheel housing - that's what!
One way to remove the bearings from the flywheel housing is to pop it in the oven for ten minutes, then take it out and slam it on a piece of wood. In theory this will dislodge the bearings. Similarly the new bearings go into the freezer for an hour and then drop into the flywheel housing.

Success - here is the (finally) finished job. The large bearing (which is just the outer race for the first motion shaft roller bearing) came out with the heat treatment and the new one (fresh from the freezer) tapped straight in.
The smaller bearing on the left (for one end of the idler gear) was such a tight fit that I had to resort to very carefully applied brute force - if there is such a thing.

OK, time to attach the engine to the gearbox. Both elements are as close to spotlessly clean as possible in a garage and ready to go.
The crank, pistons, camshaft, timing gears, etc have never been in this block. This engine and this gearbox have never been together - but it should all work out alright.

The floor of my garage hardly offers the clinical conditions of a Formula One assembly area but things can still be kept clean.
The handy build trolley is made from scrap timber with metal castors underneath to allow movement around the garage.
With the engine now back in the garage, Grace finally has her kitchen table back - Thanks Hun.

The transfer gears have been shimmed and run nicely, the transfer case is in place, as is the salvaged breather pipe. The clutch cover is temporarily in place, which has let me find all the necessary nuts and bolts.
This feels like progress. The water pump comes next and then I need to gather the parts for the flywheel/clutch assembly.
My past experience with Mini's has shown that paint does not stick well to the alloy gearbox and transfer gear/clutch housing parts. I have left these in bare metal but will give them a light oiling to prevent surface oxidation. Having parts properly clean is so much more pleasant when assembling an engine and should increase reliability.

High capacity water pump fitted. I have tapped and blanked the outlet pipe which would ordinarily have connected to the cylinder head via the water bypass hose. My cylinder head does not run with a bypass hose so I don't need this outlet. With a big engine, cooling is likely to be another headache and this setup should help.

Lightweight flywheel fitted, with standard back-plate, race/rally-spec friction plate and heavy-duty diaphragm. This should be a fair compromise of performance and cost - I have worked hard to drive costs down throughout.
Assembly was done very carefully, with all tolerances adjusted correctly and it will hopefully prove to be a good engine.

At the other end of the engine the two-piece fan has been restored and fitted, along with the water pump pulley.
Of the many fans fitted to Mini's, this one offers the best compromise of cooling ability without drawing too much power from the engine to spin it - after a strip and repaint, it looks good too.

The modified cylinder head has slotted on nicely with a new head gasket. The high tensile studs were all good and have been refitted after a good clean and running a die along the threads.
A new set of high compression NGK spark plugs prevents any dirt getting into the combustion chambers. Finishing the head and rockers is the next task.

You rarely see rockers this clean - I'd forgotten they were meant to be silver rather than black.
Once again this rocker arrangement has the rockers from one engine, rocker shaft from another, rockers and adjustment bolts found in a box!
In the absence of a nice set of Cooper S forged rockers, these pressed steel ones are the 'next best' of the standard options.

Painted rocker cover, fresh cork gasket (to be replaced with silicon downstream), thumbscrew bolts for quick-release.
New thermostat housing as all of my old ones were past it. Thermostat is a Land-Rover part which I have drilled to allow for having no bypass hose. This opens at 82 degrees.
Keeping the engine cool will involve some trial and error.

Taking a break from the engine, I dug out the original fuel tank. Like everything else, this was pretty rough, but solid. I gave it a good rub down and with the tank hanging from the garage roof, brush-painted it. OK, it should be sprayed but the original paint was flaking off all over the place and I fancied something a bit more hard wearing. These early tanks were painted gloss and this has come up very well - cheap, tidy and practical.

I keep thinking that there are no dirty, greasy or rusty bits left and that it is finally worthwhile to wash my overalls.
This is the strap for the fuel tank. In fact it is quite good underneath the layer of muck and surface rust, It will need to be stripped, primed, painted and to have some new cushioning strips added. I certainly don't plan to buy these - have I got an old Wellington boot anywhere?

Rear bumper in place. Naturally, with this project, it needed some fabrication.
I needed to shorten some front over-riders and modified the brackets so that it would work.
It needed a little straightening too but it is good, original chrome.

The original front grille was in a right state, with numerous bent rails and others which needed to be re-riveted.
The black steel parts behind the slats were bent and had surface rust and blue over-spray - but it was original and it was all there.

Morris Mini's had grilles with straight slats but Austin Mini's had these 'wavy slats'.
You can buy new grilles to match this original 1967 Austin grille but modern chrome is just not so good and would not stay looking good for many years like original chrome will.
A replacement grille also costs around £80 so, one way or another, this one was going to be restored!

So, all broken rivets were drilled out and replaced, all bent slats were straightened, the black parts behind the slats were cleaned and repainted, the chrome was all cleaned with brasso and the (1960's) quick-release grille buttons were wire-brushed and modified. Once again, the total cost was almost zero - just hard graft.

Similar treatment was given to the grille surround (aka 'moustache') and to the surround extensions (aka 'whiskers').
The little Mini has certainly got it's face back!

The control box (aka regulator) is needed when you have a dynamo (as my Mini originally did).
It will not be needed once I change to using an alternator (which has a built-in regulator) but it will serve as a useful, heavy-duty junction box.
I removed the internal coils etc, leaving ample space for housing new connections.

I picked up a pair of used OMP race seats online. These are FIA approved and covered in black vinyl.
They have the holes required for harnesses and were extremely cheap. They are slightly wide for a Mini but given the 'stripped-out racer' look which I want, they should be ideal. The passenger seat will be offset slightly further back than the drivers seat.

The seats did not come with subframes but I have a rough old pair hanging around. Given my luck so far, I am assuming that these will not fit the seats and that a bit of fabrication will be needed.
Grace is taller than I am so off-setting the passenger seat backwards by a couple of inches will be no bad thing.

With the seats in place it will be very hard to access the rear of the cabin so I devised a quick-release mechanism, allowing each seat to be removed entirely in a matter of seconds.
Designing this took a long time but it is very neat, safe, robust and actually very simple once I figured it out.

Whilst almost no parts were salvaged from those old subframes, I have kept the bar that runs across the back of the seats.
I even had to modify these though, and also welded plates to the floor to support the feet (otherwise some of the feet would want to sit in the grooves on the floor).

I fabricated an ignition box from a flat sheet of 1.5mm aluminium - I'm pleased with this but it may change if a front cage is fitted.
It houses the battery master switch (which will also be linked to an external pull-cable), a toggle switch for the fuel pump and the engine start button (which is identical to that fitted as standard in an E-Type Jag).

Working on the electrical system, I rigged up a temporary cut-off switch under the bonnet so that I could easily test each circuit as I added it.
Whilst I understand Mini's pretty well, there was still a lot which I needed to carefully figure out.
I also need to convert for Negative Earth and alternator - rather than Positive Earth and Dynamo.

I am fed up with the state of my garage. I shouldn't moan because (a) I have a garage and (b) it is a good size, but it needs rewiring, it is cluttered, dull and seems to always be either too hot or too cold. Oddly, the first step was renovating my garden sheds. The bottom shed contains general stuff, the middle one contains car parts and the top one is more of a workshop. All three were unusable and this forced a lot of junk into the garage and hence the problem. Each shed needed major repairs to their bases, to all walls, fresh paint and a fresh roof. They are now clean, fresh and dry.

I am especially pleased with the middle shed which has really let me sort out my stock of car parts. I have spent very little, by re-purposing old shelving and all manner of junk which was hanging around. I now know what I've got and where to find it.
There was even a complete Landrover differential in the back of this shed, which I had forgotten I even had!
It was also an opportunity to throw out a great deal of rubbish.
Still haven't found the missing Mini gear lever knob (black plastic original Mk1) but I am convinced that I have not chucked it out.

So, with my sheds sorted, I was finally able to start on the garage itself. This was another big job.
I am almost finished in this picture.Things which were not essential were put away properly in the sheds and rubbish could be thrown out.
I was also redecorating my daughter's bedroom and the addition of a larger TV meant that she no longer had wall-space for her large white-board - her loss was my gain, as a white-board is a very handy addition to a busy garage, with a long list of jobs now recorded and gradually being worked-through.

First off though, I needed to completely rewire the whole garage. This uncovered numerous examples of poor wiring and was a chance to get switches and socket outlets just where I wanted them.
If very sharp-eyed, you may have noticed that the driver's side headlamp has blown - the 50 year old sealed beam unit objected strongly when I put 12 volts through it.

During the garage makeover I also changed the roof lights, by installing three double LED strip lights. These are just a game-changer - they are so bright and the garage is now an entirely different place in which to work. Whilst much brighter than ordinary lights, these use far less energy and are expected to pay for themselves in around 18 months.

I also took the opportunity to move things around, to dump the manky old workbench and to build a new one from scratch.
I can now stand on this as it is so strongly constructed and it gives me plenty of room to work and to store things.
The combination of sorting out the sheds and garage has also located all of my tools and these are now put away where they can be found again (not sure I need eleven 10mm spanners though). Throughout this work I have repurposed materials and in this way have kept the costs right down to a bare minimum.

The first job in my 'new' garage was to rebuild the 7.5" Cooper S brake calipers. I bought these more than 10 years ago and when dismantled I found a fair bit of muck inside them, although the pistons cleaned up fine.
With a thorough clean, respray, new seals, bleed nipples and stretch-bolts, they now look lovely. Hopefully they will work as good as they look.

The old interior door handles have niggled me for ages. There were some nice original aftermarket ones produced but these were basically chrome-plated mazak and tended to snap - and are very expensive (£30 a pair - if you can even find them now).
Consequently, I have 'one and two halves' of these. I also have a pair of less attractive 60's handles such as the one shown here. These were also very flimsy and one of mine is about to break. Plus, they are just a bit naff.

So, I had a go at making a pair. I must say, that I am well pleased with these. They are made from two sizes of square-section steel tube, very carefully measured and cut, then drilled for a strong mounting bolt, welded together from inside, cleaned up and sprayed.
By lucky chance, the original rubber ends were just about able to be re-used (although I don't think they'll last). These handles look good and should be super-strong. I will cross-drill them to reduce their weight.

The front hubs came next. I gave these a decent clean some time back to remove decades of dirt but I have now cleaned them more thoroughly, re-shimmed the swivel bearings where required, run a die down the threads, cleaned the nuts and given the hubs a dusting of VHT paint. I think that the bearings will go again but will not be sure until the drive shafts are in.

Trying to fit the hubs showed me that I had fitted each lower arm on the wrong side of the car.
They looked right but my schoolboy error meant that the taper went the wrong way, so preventing the bottom hub swivel joint from going into the bottom arm.
Original tie bars are a temporary fit - H/D adjustable ones to follow

Front hubs were separated from the disks and cleaned up (this image showing 'before & after').
These are fine to use again. The splined centre engages with the end of the spindle, which is attached to the drive shaft.

Here are the two cleaned hubs on their spindles.
The hubs are bolted into the disks to form an integrated unit. The spindles are thicker than those for drum brake Mini's, so the big castle nuts are also specific to Cooper 'S' front disks.
Cleaning parts costs you nothing.

This is more like it. Front spindles fitted into the hubs, restored disks in place, restored calipers fitted.
Very few new parts were needed as most things were salvaged from my parts shed.
There is something wrong at the front though - I think I have the wrong front struts on and need shorter ones - a problem for later...

Some experimentation is needed, as I may need some wheel spacers at the front - I need to measure and compare the front and rear track to understand this better.
I have a pile of old narrow spacers in the shed which should let me get front and back tracks just right.

So, I dug out those old wheel spacers and painted them up.
I started with three on each side to see where I was, but found that it worked best with no spacers on the front after all - and just the 'built-in' (1") spacers at the rear which are part of the Minifin brake drums being used.
So these spacers can all go back in the parts shed - at least they are clean now - Doh!
.

By 'eck, these are pretty!
I got hold of some Ultralite 6x10 alloy wheels with Yokohama A032 tyres.
These wheels have a -3mm offset and the gold centres go well with the blue bodywork. The soft compound of the tyres should give good grip.

These wheels are based on the classic 'Minilite' design but are massively cheaper.
They seem really good and are certainly very lightweight.
The front track is a bit too wide in this image and needs to come in, to match the rear, which is about right. I may need to change the front studs back to shorter ones.
Needless to say, wheel arch extensions will be needed later.

Next up were a couple of jobs which sounded quite simple - but weren't.
The early Mini's had sliding windows and I needed to fit new channels for these and then fit the glass.
As always, I had a stock of glass and picked out four good pieces and then gave them a good clean.
Fitting the windows is very tricky on your own, with plenty of scope to drop the glass on the floor - I got lucky this time.

Here is an original Mini radiator - from a small bore Mini. Even if it was not knackered, this would be no good for the upgraded Mini which I am building and so I picked up a bargain radiator at a local Mini show.
I do need the cowling pieces from this old one though. You have heard me say it more than once, but I do hope that this might be the last bit of rusty old Mini which I need to restore.
Doubtless a little tweaking will be needed to get the old shroud sections to marry-up to the new radiator.

Taken back to bare metal and then given a quick blow-over with a rattle can and the old shroud really does look rather good.
It will need minor tweaks but nothing major. I would like to save as many old Mini bits as possible, from the various Minis which I have had over the years plus bits I have picked up along the way.

After a bit of larking about the shroud is on. Some bolts needed to be shortened and some holes in the shroud enlarged but this looks rather good.
This radiator is by a company called Fletcher and has some fixings which my Mini will not need to use.
On a Mini, the fan pushes air out of the car through the radiator, unlike most cars where the fan pulls air into the car through the radiator.

Meanwhile I am also trying to upgrade the headlamps. My old Mini was born with sealed beam lamps - cheap units in which the glass part and the bulb were integrated as a single 'sealed beam' unit so when the bulb blew, you had to change the whole thing.
50 years ago these were fine because every car had the same lights but compared to modern cars they are pretty rubbish. My plan then, is to replace the headlamps with new glass units which can take replaceable H4 Halogen bulbs.

The new Halogen units from Minispeed (who know their stuff) went in easily enough. A bit of simple rewiring and soldering was needed but nothing very clever.
One minor snag though, is that they don't actually work - which I think is down to a dodgy dip-switch. Nothing is ever easy....

While sourcing a new dip-switch, I sorted out a reverse light. This fits on the boot lid and is a part of the 'must-have' styling for an early performance Mini.
A nice centre-mount lamp is the increasingly rare Lucas 576 unit shown here. This one is mine but I want to try a different approach.

I picked up an old lamp on eBay for a fiver which might suit my needs better. Here it is stripped down. Modifications were called for (of course). The first is a new mounting pedestal, seen here added to the back of the lamp (which originally had a mounting bracket at the bottom). This chrome-plated 1960's lamp is by Wipac.

When finished, the modified lamp will attach to the car via a machined bolt passing through the new pedestal, now on the back of the lamp.
A matching fixing is needed on the boot-lid - made from square section tubing and an old (re-profiled) plastic wiper blade mounting - again all stuff from my supply of spares and junk.

And there it is finished - another apparently simple job which took me quite a while to achieve nicely.
This lamp uses a powerful 1960's Lucas Flamethrower bulb, which may need to be toned down - but it works well and will be fine for now.

Meanwhile a new dip-switch and some tweaking got the headlamps working perfectly. I also sorted out the indicators which now work well (which is a little unusual on an early Mini). The front track has been narrowed to match the rear, but the front end is definitely too high - and not just because it has no engine fitted yet.

Here is the fuel pump, fitted in the boot. This replaces the original electric fuel pump (which was the early SU type fitted to the rear subframe).
This one is an American 'Facet' performance pump, able to reliably deliver a greater volume of petrol to the twin carbs. I have mounted it on a thick steel plate to ensure it is secure.

The exhaust manifold is a Fletcher performance long centre branch.
Unfortunately it didn't fit very well. The outside pipes were fine but the centre branch had the manifold connection (where it meets the cylinder head) welded at the wrong angle. If you look closely you will see that the centre fixing is not flush to the head and is badly twisted in order to be forced into the collector where the three pipes join (and it is at full stretch to even achieve this). I bought this manifold new, but very cheaply at a show and changing it would be a pain (and would still not guarantee a perfect replacement). Just one answer then....

I very carefully cut away the weld around the top of the pipe and removed the manifold connection completely from the pipe. In this picture the pipe is in position (slightly rotated) but not yet re-welded. This will completely release the pressure as the separate pipes now just slide together (after removal of any burrs). You will see that the manifold connection is now flush to the head. I will tack-weld the pipe to this and double check the fitment with the engine in the car before doing the final weld. This now looks perfect though. It would be nice if something new would just bolt on.

Whilst I have a couple of distributors, these are intended for smaller engines and are fairly ancient. So I fitted a new performance dizzy, with vacuum advance.
This electronic unit has no points which should aid reliability and smooth running.

I wanted to make sure that the engine had good oil pressure to avoid getting it into the car and only then finding that I had a problem - typically either a leak or an inability to get pressure.
I have learned in the past that it helps massively to prime the oil pump by winding the engine backwards whilst trickling oil into the pump through the outlet hole on the front of the block.
I have connected up a remote oil pressure gauge and fitted a new starter motor as the old one was running too slowly and the pinion was not returning properly on its spring.
I quickly saw good oil pressure, so that is one less problem.
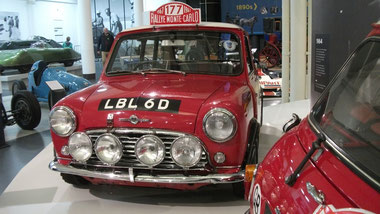
If only this one was mine! - I was at the British Motor Museum in Gaydon (for a Meccano event) and took some snaps of what must be the most famous Mini of them all.
Against all odds LBL 6D won the Monte Carlo Rally in 1967, driven by Rauno Aaltonen and Henry Liddon.

The carbs are finished and ready to go on. New jets, gaskets, needles, springs and a lot of tweaking were involved, as well as internal and external manifold work - all quite enjoyable though.
Some research into the id tag on the carbs found that they originated on a late 1970's Morris Marina 1800 TC!

A pair of relays are now in the boot - one for the reverse lamp and one for the fuel pump.
the wiring needs to be tidied but then the boot area will be about done.
I also adapted the boot-lid to be quick-release, now removable in 30 seconds

Since rebuilding I have had a snag with the front suspension. To cut a long story short I have replaced the rubber cones on all 4 wheels and swapped to Hi-Lo adjustable suspension units. This image shows the difference in height between my old cones (left, with standard struts) and the new ones (right with Hi-Lo). The new ones will settle & squash down in time but retain their bounce, allowing the Mini to be slammed down whilst retaining some degree of comfort. Ideally rubber cones should be changed every 7 - 10 years but mine were original Dunlop ones, around 45 years old and rock hard.

In theory I should be able to fit the engine with the radiator in situ but I found this was impossible. In the end I removed the radiator, along with the starter motor.
Whilst my radiator is aftermarket, its dimensions exactly match the original, so I need to do some thinking - another mismatch of parts from different ages of Mini.

There it is in place - a good step forwards. With the rad, starter motor and manifolds removed, the engine just dropped into place. It will need to come out again - perhaps several times as I figure out how to fit that rad, wrestle in the exhaust manifold, fabricate the exhaust system, sort out the gear-change, engine steadies, drive shafts, engine electrics, servo - but it is in for now.
The weight of the engine will also compress the new front suspension cones - hopefully achieving a level (and low) ride height. The car immediately dropped 10mm as the weight came off the crane (a handy tool to have) and another 20mm overnight. In turn, this drop will allow me to finally fit the shortened front shock absorbers and torque the front suspension properly. That quick-release front grille was very useful today.
This image also shows my budget roof blinds - 20 quid for the whole garage and it keeps the place a lot cooler. this will do until I get around to putting a new roof on.

I eventually persuaded the rad to fit - with no fan spacer and using an earlier rad lower mounting bracket, a cut and welded upper bracket, modified lower mounting bolts and tweaks to the shrouds. Individually each of these changes won me just a few millimetres extra clearance but collectively they did the job with just a little room to spare.

With the engine temporarily fitted and located by upper and lower steadies, I set about the exhaust system. Essentially I have the Fletcher LCB manifold, a big 'Play-Mini' centre-exit back-box and a straight length of pipe from which I must fabricate something to join it all up - hopefully without anything fouling (remember that special bracket I made up?).

I was not happy with the Fletcher exhaust collector (where the two pipes from the LCB join together). It pointed upwards and to one side slightly too much, putting a lot of strain on everything. This shot (engine to the right) shows the first of three slots I cut in the collector so it could be bent to get the shape right, then welded up.

Finally everything fits with a little room to spare. Modified LCB collector is nearest the camera, joining the DIY main pipe which I fabricated with a subtle double kink to bring the far end into the centre of the tunnel where it joins the 'Play-Mini' back-box. The whole system now just falls together and should give a very free gas flow indeed.

Well, I have the engine running and whilst rough, it sounds quite impressive. However I also had a comprehensive snag list to sort, so it all came out again. I also made a bracket from scrap to move the coil over the alternator.
The engine has already been in and out several times (my current record is just over 2 hours).

This image shows the oil catch tank and brake lines in place and all the cables etc tidied up. Flexible hoses feed the servo, so that it can be moved out of the way when the engine needs to come out, without the need to drain the braking system. Also in place are the air filter back-plates.
There is not a lot of room left for much else now!

I have extended the cage forward, which adds a lot of rigidity. I also want to move some ignition controls onto the cage above my head. In this image the front cage is still covered in polythene.
As far as interior trim is concerned, it is probably fair to say that I have taken a 'Less is more' approach!